The #1 Key to Selling Albums

The number one rule in album sales is:

If you want to sell albums, you have to show clients physical studio samples. This can be a tough pill to swallow when albums run anywhere from $300 - $1,200 in costs for the photographer. And that's just the printing and binding. That doesn't take into consideration the costs and time investment in getting it designed and ordered. Yes, studio sample albums are an investment. But they are an investment that will pay off.
A few years ago I decided to start offering Queensberry Duo albums as an option for my high end clients. These albums are gorgeous -- high end mat paper surrounds images that are inset in the pages, and images can even be mounted flush to the edge of the page. So it is a more contemporary version of a matted album combining both matted and flush-mount features into a high end custom product. The album I chose to offer is 18x10 inches horizontal with a dark brown micro-leather fabric. The cover material is so soft, I am tempted to use it as a pillow. The album is INCREDIBLE. But it's not cheap. The studio sample I wanted to get was over $1,000. Yikes! Not only does that money come out of my bank account, but that means I have to charge my clients $3,500 for an album of its kind. All sorts of fears went through my head. What if no one else loves it as much as I do? What if my clients don't see the value and aren't willing to pay the high price tag?
A few years ago I decided to start offering Queensberry Duo albums as an option for my high end clients. These albums are gorgeous -- high end mat paper surrounds images that are inset in the pages, and images can even be mounted flush to the edge of the page. So it is a more contemporary version of a matted album combining both matted and flush-mount features into a high end custom product. The album I chose to offer is 18x10 inches horizontal with a dark brown micro-leather fabric. The cover material is so soft, I am tempted to use it as a pillow. The album is INCREDIBLE. But it's not cheap. The studio sample I wanted to get was over $1,000. Yikes! Not only does that money come out of my bank account, but that means I have to charge my clients $3,500 for an album of its kind. All sorts of fears went through my head. What if no one else loves it as much as I do? What if my clients don't see the value and aren't willing to pay the high price tag?

I swallowed my fears and took the leap. I ordered my studio sample and said a prayer right before my first client meeting in which it rested on the ottoman in my office. Kari, the bride, came in and we started out the meeting chatting about her upcoming wedding. When it came time to share my two album options, I showed her the standard, lower-priced album that comes in all of my packages, then I showed her the Duo. I explained its features and told her the price. She fell in love with it as she turned each of the textured mat pages and felt the micro-leather. At the end of the meeting she told me that she didn't have the budget for the Duo but that she wanted to see if she could move some things around to be able to increase her photography budget and include it in her package. And that's just what she did.
The expensive Duo is not for everyone, but it does appeal to a certain segment of my clientele. And if they see it and love it, they are often willing to increase their budget, even though they never intended to spend $3K on a wedding album when they first walked into my office.
You can't sell it if you don't show it. But if you DO show it, you might be able to sell something that your clients didn't even realize they couldn't live without until they touched it. That's the power of a studio sample album.
Not sure where to start with creating a sample album? Read up on 5 features that should be included in every sample album in order to win the hearts of your clients and get them to say YES to their very own album!
To help even further with your sample album needs, we've created this Resource List for the Top 10 Most Popular Album Companies used by Align clients, along with testimonials from photographers who use each of them. Also included on the list is a general idea of what each company charges for a standard 10x10 album. You can download it for FREE today by clicking here and signing up for an account with Align -- no order necessary! Or if you already have an existing Align account and want a copy of this resource guide, you're welcome to email us for a copy.

Take the leap. Invest in sample albums. Make them beautiful, unique, and exactly what you would want if you were a bride or groom. Then show them to your potential clients and see the investment pay off.
-----------
Blog post written by: Melissa Jill
Blog post written by: Melissa Jill
Hudson River Valley Engagement Album Design for Nidya Lloyd Photography
Today we have such a fun engagement album design to share with you! We have had the pleasure of working with Hudson Valley New York Wedding and Portrait photographer Nidya Lloyd for the past 7 years on over 50 albums! Her loose editorial style makes for beautiful images to fill out the pages of an album and of particular note -- the clear skies and perfect skin tones in her images are superb!
The sweet couple in this design love hiking and exploring and opted to do their engagement shoot at the picturesque Perkins Memorial Tower at Bear Mountain overlooking the Hudson River Valley.
We love how this design turned out! Nidya chose our "Simple" Design style -- which is perfect for engagement and portrait albums as it includes 1-4 images per spread and clean white backgrounds. The design came out to 10 spreads (20 pages) and was approved by her client after just one revision round! Nidya used our Hands-off Service, which allowed us to communicate directly with her clients and streamline the revision process.
Here are a few of our favorite spreads from this fun engagement album design:


To see the design in full, click through the slideshow:
Thank you, Nidya, for trusting us with your clients and your gorgeous images for so many years!
Thank you, Nidya, for trusting us with your clients and your gorgeous images for so many years!
-----------
Design by: Rachel (View More) // Design style: Simple (View More) // Blog post written by: Melissa Jill
Design by: Rachel (View More) // Design style: Simple (View More) // Blog post written by: Melissa Jill
Sonoma Wine Country Wedding Album Design for Buena Lane Photography
Jamie and Javier recently tied the knot at the picturesque Vine Hill House in Sonoma County, bringing together the cozy charm of a backyard wedding with the sweeping beauty of vineyard views. Jamie, a Sonoma local, and Javier, originally from Spain, chose a natural and intimate setting to reflect their personalities and love story. From the moment guests arrived, it was clear this wouldn't be your typical wedding day.
The couple's non-traditional style came through in every detail-from the relaxed vibe to the intentional celebration of their surroundings. Their wedding day felt both effortless and deeply meaningful, anchored in the love they share and the people they chose to celebrate with. Guests enjoyed a lively dance floor and a perfect fall evening capped with s'mores roasted under the stars-what could be better?
Well, we'd argue the only thing that rivals experiencing this wedding in person is reliving it through the pages of their album. Is there anything better than a wine country wedding on a cool fall day? The spreads of this wedding album make a strong case that there is not.
We had so much fun working on this stunning 30-spread, 60-page album for Eileen of Buena Lane Photography. Eileen's work beautifully captured not only the golden vineyard setting and thoughtful details, but also the genuine connections and joyful moments shared throughout the day. Her clean and minimal aesthetic -- favoring fewer images per spread -- let every photo truly shine.
Designing this album was a joy. It's never easy to fit the full story of a wedding into a limited number of spreads, so we were thrilled to have the space to let each image breathe. Eileen's storytelling through photography made our job seamless, and we're so proud of how this album came together.
Here are a few of our favorite spreads from Jamie and Javier's unforgettable day. We hope you love them as much as we do.


To see the design in full, click through the slideshow:
Thank you, Eileen, for allowing us to work with your gorgeous images!
Thank you, Eileen, for allowing us to work with your gorgeous images!
-----------
Design by: Kari (View More) // Design style: Classic (View More) // Blog post written by: Melissa Jill
Design by: Kari (View More) // Design style: Classic (View More) // Blog post written by: Melissa Jill
How many album options should I give my clients?
I once learned a valuable lesson in sales when I was remodeling my house.
I purchased a home in Phoenix back in 2010. When I bought it, the family room looked like this:
I purchased a home in Phoenix back in 2010. When I bought it, the family room looked like this:

I had a bunch of plans for fixing it up, including new wood flooring, new trim, fixing up the built-in, and covering the fireplace hearth in brick. Now if you've ever been through a home renovation, you know how exhausting it can be and how many endless decisions you have to make. In many ways, it's like planning a wedding. You don't have a whole lot of experience or knowledge of the industry, but you need to make gazillions of choices that will impact the end result you get to live with for a long time to come. No pressure :).
Being the efficient and decisive person I am, I wanted to work through my checklist and get the process moving. One day I took my mom along with me to a local brick store to pick out the brick for the fireplace. I knew I wanted a basic red brick that might look like it was original to my 50s ranch home. I figured I could be in and out of that store in 20-30 minutes tops with one less thing on my list. We walked into the small store that wasn't much bigger than the family room I was remodeling, and found ourselves alone with the store manager. He was friendly and talkative. On all of the store walls hung one-by-one foot samples of various brick styles:
Being the efficient and decisive person I am, I wanted to work through my checklist and get the process moving. One day I took my mom along with me to a local brick store to pick out the brick for the fireplace. I knew I wanted a basic red brick that might look like it was original to my 50s ranch home. I figured I could be in and out of that store in 20-30 minutes tops with one less thing on my list. We walked into the small store that wasn't much bigger than the family room I was remodeling, and found ourselves alone with the store manager. He was friendly and talkative. On all of the store walls hung one-by-one foot samples of various brick styles:

I filled the manager in on my project in hopes that he could help direct me to the best options for me. As I looked at the brick, attempting to envision them on my fireplace hearth, the manager continued to chat, giving me more and more options. It was clear that he was excited. This guy loved his job and was completely geeked out on all things brick. I loved his passion, but as I was browsing, I felt my blood pressure begin to rise as he piled on the options. I did everything but say the words "I'm sharing all of this with you so that you will help me make a decision," but he wasn't picking up the hints I was dropping. In the end I left the store feeling overwhelmed and confused. I had walked into that store that day fully expecting to give them my money. Instead, I walked out empty handed. The way that store manager had directed his passion and excitement for his specialty had unknowingly cost him a sale.
A few days later I did go back to that brick store. But I put my blinders on, didn't talk to the manager, and picked out some brick in minutes. I was bound and determined. And this was the end result of my remodeled family room:
A few days later I did go back to that brick store. But I put my blinders on, didn't talk to the manager, and picked out some brick in minutes. I was bound and determined. And this was the end result of my remodeled family room:
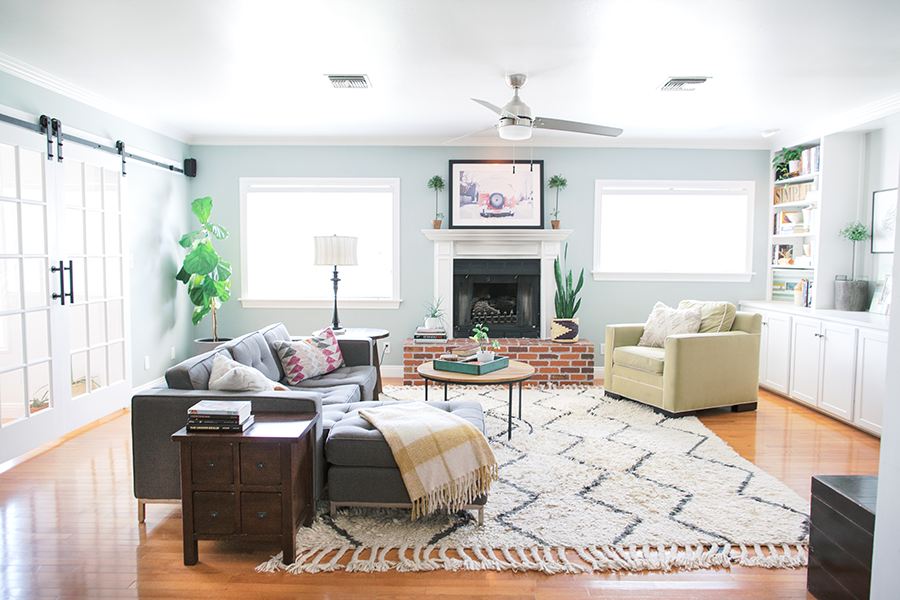
This experience taught me that customers don't want too many options. They look to the experts for help in narrowing down those options.
As a wedding photographer, I am excited about wedding albums. I go to trade shows and geek out on all of the paper and cover options. I love to feel and touch them. But even though WE are excited about albums, it behooves us as photographers to realize that our clients aren't nearly as passionate about them. They want a great album to cherish for their lifetime, to be sure, but they want to be able to see what they are looking for, point to it, pay for it, and cross one more thing off their list.
If we want to increase our album sales and serve our clients well, we need to make choices easier on them. Just because the album company I use gives me 5 paper options, 10 cover options and 5 album styles, doesn't mean I have to pass all of those options on to my clients. If I were to do so, I would be putting up an obstacle to a sale and unnecessarily complicating my clients' lives. Instead, I have picked out one album size, one cover option and one paper type that I LOVE from my album company, had a sample album created with it, and that is one of the two options I give my clients. The other option is a completely different album from another company -- again with one size, one paper type, and one cover option. That way my client has two choices and can point to one or the other. If they ask for more options on the cover or size of the album, I can always offer those. But I only do so if they ask. Typically they don't. They fall in love with one of the two options, point to it, and sign the contract. DONE.
In your album sales process, make choices easier on your clients by picking what YOU love and showing it to them. Offer one or two options. They will love you for walking them through a world that is foreign to them and for being the expert that guides them to exactly what they are looking for.
If you found this post helpful and would like to receive tips like this straight to your inbox, click here to sign up!
And exciting news! If you're a photographer who wants to start offering albums without investing hours of guesswork and trial and error -- we have a solution for you! Check out the Album Start-Up Kit and start maximizing your profit today!

-----------
Blog post written by: Melissa Jill
Blog post written by: Melissa Jill
Stunning Downtown Detroit Wedding Album Design for Jean Smith
Jean Smith does it again!
We're approaching 200 albums designed for talented Detroit wedding photographer Jean Smith in the past 12 years and have featured over 15 of our favorites on this blog.
We. Cannot. Get. Enough.
Jean can do no wrong. She photographs every single wedding day so flawlessly and her composition, use of light, and documentary story-telling skills always impress.
The album designs we are able to create with Jean's work are definitely stand-outs. Take a look at the first spread below, for instance. We love the mix of black and white and color images, the tight and wide compositions, and how each image stands so beautifully on its own yet fits so cohesively together with the others as a unit on this filmstrip spread.
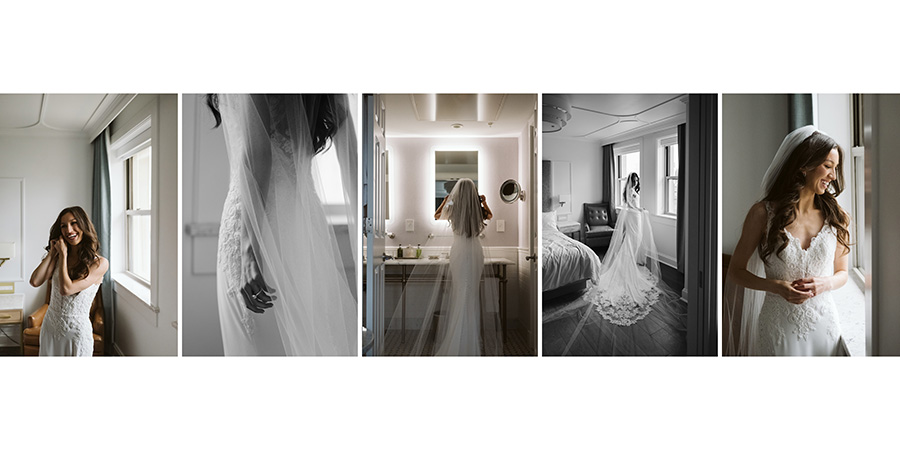
Here are a few of our other favorites from this gorgeous design:
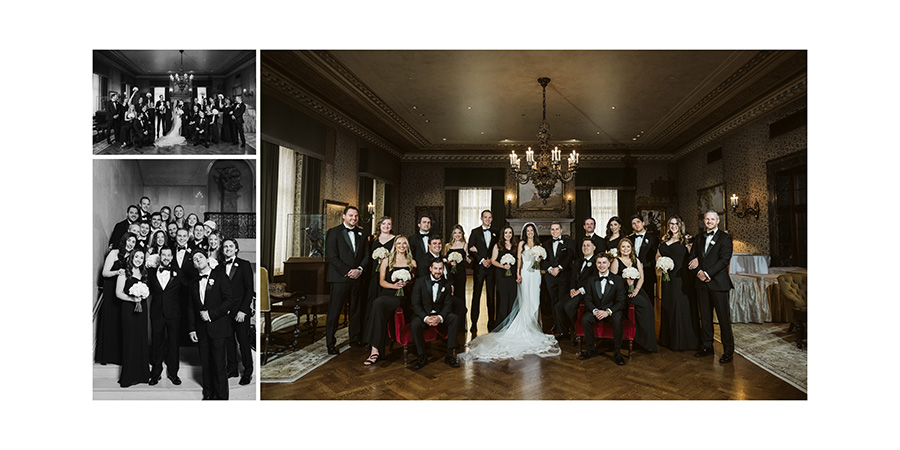
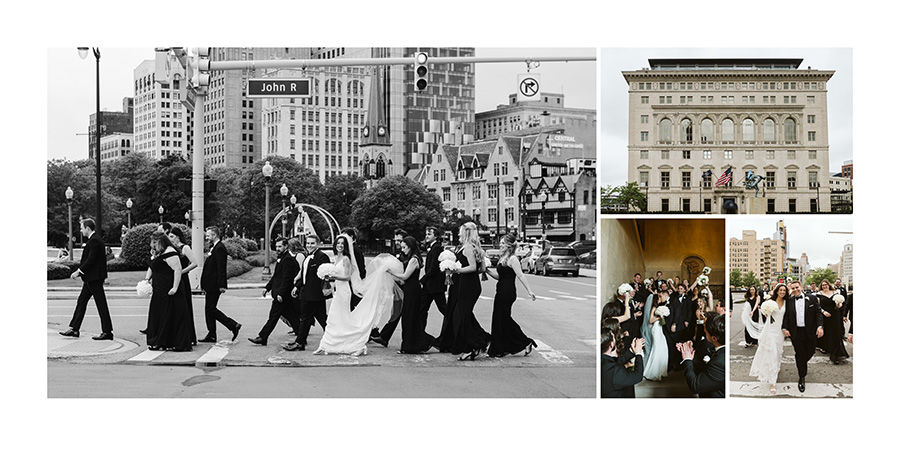
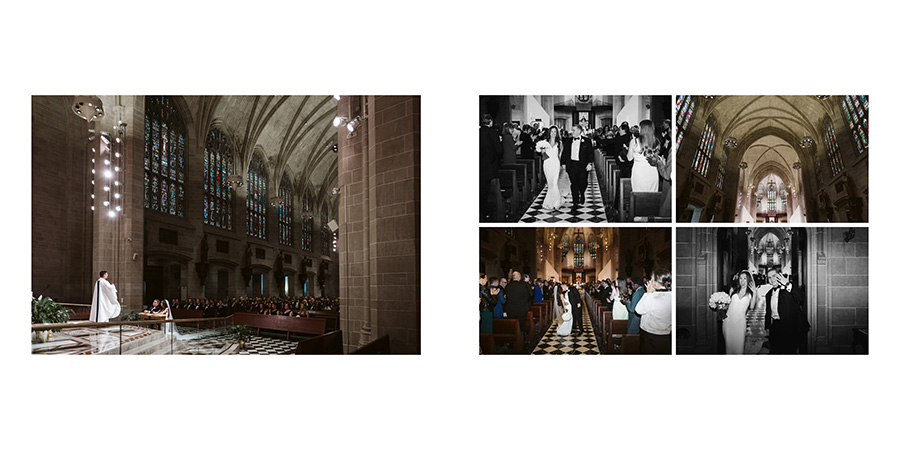
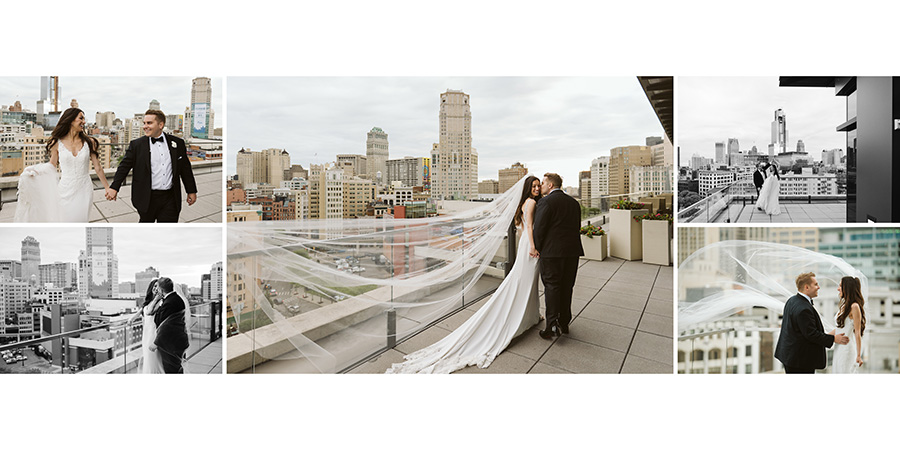
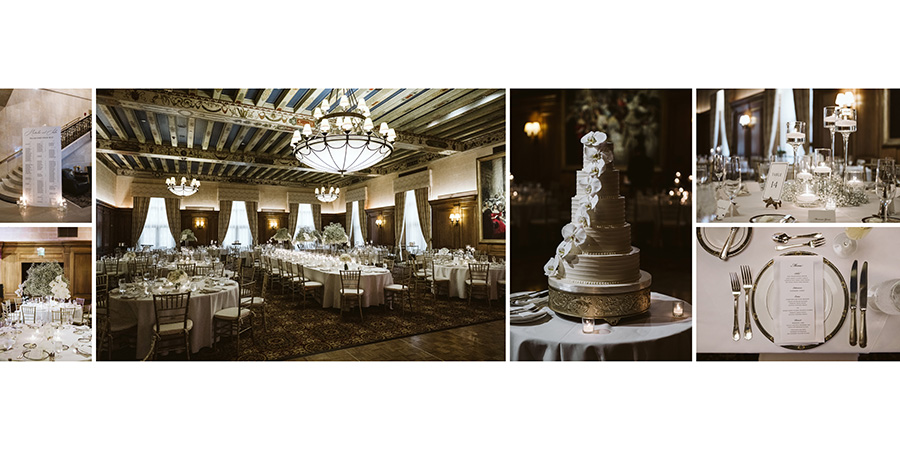
To see the design in full, click through the slideshow:
Thank you, Jean, for trusting us all these years!
Thank you, Jean, for trusting us all these years!
-----------
Design by: Kari (View More) // Design style: Classic (View More) // Blog post written by: Melissa Jill
Design by: Kari (View More) // Design style: Classic (View More) // Blog post written by: Melissa Jill


